We’re excited to share our guide on creating a retro modern backsplash for your kitchen. This project can add a unique touch to your space. With over 26 unique retro kitchen backsplash designs available, you can choose the one that fits your style.
A mid-century modern backsplash is a great option. It uses pastel colors and multicolored tiles to enhance the kitchen’s nostalgic look.
A retro modern backsplash can make your kitchen look 50% better. It’s a great way to improve your home’s value. Plus, DIY projects for retro-inspired kitchens are affordable and easy to do.
Key Takeaways
- A retro modern backsplash can add a unique touch to your kitchen
- Over 26 unique retro kitchen backsplash designs are available for inspiration
- A mid-century modern backsplash can incorporate pastel colors and multicolored tiles
- Retro modern backsplashes can provide up to 50% visual impact in the overall design scheme of a kitchen
- DIY projects for retro-inspired kitchens can be a cost-effective way to transform your space
- Retro modern backsplashes can be made with various materials, including vintage-inspired backsplash and retro modern backsplash
- A retro modern backsplash can be a great way to improve your home’s value
Understanding the Retro Modern Aesthetic
We often look to the past for home design inspiration. The retro modern design mixes old and new, creating a unique style. It features clean lines, little decoration, and focuses on being useful.
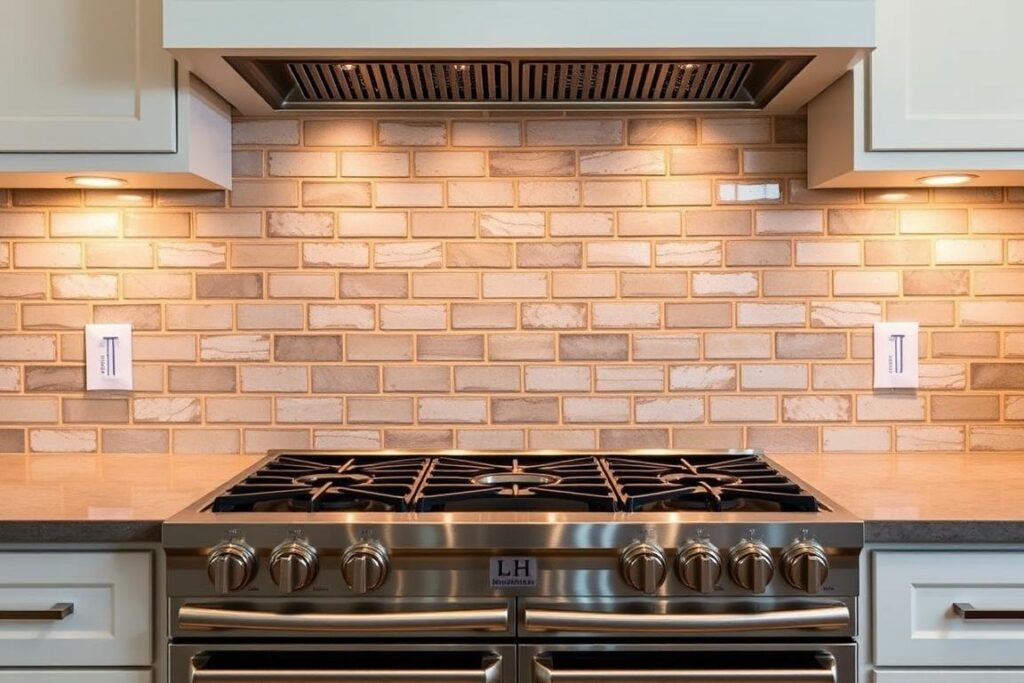
To add retro modern style to your home, think about vintage decor. This could be vintage tin tiles or old-style lights. A white tile backsplash with a 3-D triangle design can also make your kitchen stand out.
Defining Retro Modern Style
Retro modern style combines old charm with modern sleekness. It’s closely tied to mid-century modern style, which was popular from the 1930s to the 1960s.
Key Features of Retro Modern Design
Some key features of retro modern design include:
- Simple and clean lines
- Minimal ornamentation
- Emphasis on functionality
- Vintage-inspired decor
- Natural materials, such as wood and stone
By using these elements, you can make a retro modern space that’s both stylish and practical. Whether updating your kitchen or living room, this design adds personality to your home.
Benefits of Installing a Retro Modern Backsplash
A retro modern backsplash can change your kitchen’s look. It adds a unique touch and can raise your home value by up to 20%. This is because it makes your kitchen look more expensive, which attracts buyers.
Some key benefits of a retro modern backsplash include:
- Enhancing the aesthetic appeal of the kitchen
- Increasing the home value
- Providing a unique conversation starter
78% of homeowners say a well-designed kitchen remodel boosts functionality and keeps charm. Also, 72% of remodeling projects focus on looks, which raises home value. A retro modern backsplash gives your kitchen a stylish look that attracts buyers.
For kitchen backsplash ideas, you have many choices. You can pick a classic subway tile or a unique hexagonal mosaic. Choose something that shows your style and fits your kitchen’s look. A retro modern backsplash makes your kitchen stylish and functional, raising home value increase and attracting buyers.
Selecting the Right Materials for Your Backsplash
Choosing the right materials for your retro modern backsplash is key. Look at different options like ceramic, glass, and natural stone. Find the one that matches your kitchen’s style and look.
Color palettes are also important for a retro modern look. You can pick from bold colors, pastel shades, or neutral tones. Shades of blue and green are favorites for their calm appeal, chosen by 35% of homeowners.
Here are some top tile options for your retro modern backsplash:
- Ceramic tiles: known for their durability and versatility
- Glass tiles: contribute to a modern aesthetic and can create the illusion of a larger space
- Natural stone tiles: provide unique patterns and textures, enhancing durability and increasing home value
Think about maintenance, durability, and cost when picking your materials. The right choice will make your space beautiful and useful, boosting your home’s value.
| Material | Cost per Square Foot | Durability |
|---|---|---|
| Ceramic Tiles | $8-$20 | High |
| Glass Tiles | $10-$30 | High |
| Natural Stone Tiles | $20-$60 | Very High |
DIY vs. Professional Installation
Homeowners face a choice when installing a retro modern backsplash. They can do it themselves or hire a pro. DIY might save money, but it’s not always the best choice if you’re new to tile work.
Before deciding, weigh the pros and cons of DIY. Some good points include:
- Cost savings: DIY backsplashes can be 40-60% cheaper than hiring a pro.
- Flexibility: You can work at your own pace and make changes easily.
But, DIY also has downsides:
- Lack of expertise: Without tile experience, you might run into problems.
- Time-consuming: DIY can take a lot of time, even for simple designs.
Hiring a pro for your kitchen renovation can ensure quality. About 90% of homeowners are happy with their backsplashes installed by experts.

Choosing between DIY and a pro depends on your skills, experience, and budget. If you’re not sure, hiring a pro is safer for a top-notch result.
| Installation Type | Cost | Satisfaction Rate |
|---|---|---|
| DIY | 40-60% less than professional | 75% |
| Professional | $800-$1,200 | 90% |
Planning Your Backsplash Layout
Creating a stunning kitchen design starts with a well-planned backsplash layout. It’s important to measure your space accurately and think about different design options. Remember to use measurement tips for a smooth installation.
When planning your backsplash, think about the look you want. For a retro modern vibe, try geometric tile patterns or bold colors. Some great choices include:
- Geometric tile backsplashes with hexagonal shapes
- Subway tile with white or black options
- Penny tile backsplashes with round tiles and colorful installations
By choosing the right options and measuring well, you can make a beautiful backsplash. It should match your kitchen design perfectly. Don’t forget to consider measurement tips for your design.
With careful planning and detail, you can make a stunning backsplash. It will make your kitchen look and feel amazing. The right backsplash and design elements will make your space beautiful and functional.
| Backsplash Option | Description |
|---|---|
| Geometric Tile | A popular choice for retro designs, emphasizing hexagonal shapes |
| Subway Tile | A classic option with white or black options, providing subtle interest or dramatic effect |
| Penny Tile | A colorful and striking option, utilizing round tiles to create unique patterns |
Preparing Your Workspace for Installation
Starting the backsplash installation means getting our workspace ready. We need tools like a tile cutter, level, and safety goggles. These can cost between $225, depending on quality and brand.
It’s key to have the right tools for a professional look. Safety is also important. We might face cuts from sharp tiles or injuries from heavy things.
To stay safe, we wear safety goggles, gloves, and a dust mask. We also make sure our area is well-ventilated and free from tripping hazards.
Here are some tools and supplies we need for the job:
- Tile cutter
- Level
- Safety goggles
- Dust mask
- Gloves
- Grout
- Thinset mortar
- Tile spacers
With the right tools and safety steps, we can have a smooth installation. The total cost can be around $1,234, based on materials and tools. Careful planning is crucial for a great result.
Step-by-Step Installation Guide
We know a good retro modern backsplash needs careful planning. We’ve made a step-by-step guide to help you. It covers everything from getting ready to putting in the tiles.
Installing a retro modern backsplash can be easy if you have the right stuff. With the right tools and patience, you can make your kitchen look great in just a weekend. It’s a big upgrade that will last for years.
Surface Preparation
Getting your surface ready is key for a good install. Clean the area, take off old stuff, and prime if needed. Use cement-based adhesive for durability, like in kitchens and bathrooms.
Tile Installation Techniques
After getting your surface ready, start putting in tiles. Use spacers and a level for even spacing. Darker grout gives a modern look. Work fast with grout because it dries quickly.
Here are some extra tips for installing:
- Use a tile cutter for cuts around switches and other stuff.
- Put adhesive on the tile back and set it in 1 minute, before it dries.
- Wipe off extra grout with a sponge, do it 2 to 3 times as needed.
Follow these steps and tips to make a stunning retro modern backsplash. It will make your kitchen look better and increase its value. Plan your layout well, thinking about tile size and any obstacles.
Finishing Touches for a Retro Modern Look
To finish your retro modern backsplash, add the final touches. This means grouting and sealing it. This protects it and makes cleaning easier. Use top-quality grout and sealant for a lasting finish.
Grouting and Sealing the Backsplash
Grouting and sealing are key for a retro modern look. Sealing the grout stops stains and makes cleaning simpler. Choose a grout sealer made for retro modern backsplashes.
Adding Decorative Elements
Decorative elements like trim and molding can make your backsplash pop. Think about colorful tile accents or patterned tiles for interest. Some great options include:
- Decorative trim and molding
- Colorful tile accents
- Patterned tile designs
These touches can make your retro modern backsplash stand out. Pick elements that match the retro modern style and your kitchen’s design.
Maintenance Tips for Your Retro Modern Backsplash
To keep your retro modern backsplash looking great, regular care is key. We suggest a routine that includes cleaning procedures and preventing damage. This will help keep your backsplash stylish and useful in your kitchen.
Cleaning Procedures
Cleaning your retro modern backsplash is important to keep it looking good. Here are some tips to follow:
- Use a gentle cleanser and a soft cloth to wipe down the surface.
- Avoid using abrasive materials or harsh chemicals, as they can damage the finish.
- For tougher stains, mix baking soda and water to create a paste, and apply it to the affected area.
Preventing Damage
To prevent damage to your retro modern backsplash, consider the following:
- Use a cutting board when preparing food to avoid scratching the surface.
- Keep the area around the backsplash clear of clutter to prevent accidents.
- Regularly inspect the backsplash for any signs of wear or damage, and address them promptly.
Exploring Retro Modern Backsplash Ideas
When it comes to adding a touch of nostalgia to your kitchen, retro modern backsplash ideas are a fantastic choice. These designs combine the charm of vintage styles with the sleekness of modern aesthetics, creating a unique and eye-catching focal point in your kitchen.
One popular retro modern backsplash idea is incorporating vintage-inspired patterns and textures. Think geometric shapes, floral motifs, and even classic subway tiles. These elements add a touch of nostalgia to your kitchen while still maintaining a contemporary look.
Another great option is experimenting with color combinations. Retro modern backsplashes often feature bold and vibrant hues that evoke a sense of nostalgia. Consider pairing contrasting colors or opting for a single statement color to create a striking visual impact.
When it comes to materials, retro modern backsplashes can be made from a variety of options. From glass and metal to ceramic and even reclaimed wood, there are plenty of choices to suit your style and preferences. Each material brings its own unique texture and visual appeal, allowing you to create a truly one-of-a-kind backsplash.
Remember, the key to pulling off a retro modern backsplash is to strike the right balance between vintage charm and modern sophistication. By carefully selecting patterns, colors, and materials, you can create a backsplash that adds a touch of nostalgia to your kitchen while still looking fresh and contemporary.
Example of a Retro Modern Backsplash:
| Material | Pattern | Color |
|---|---|---|
| Reclaimed Wood | Geometric Shapes | Warm Earth Tones |
| Ceramic Tiles | Floral Motifs | Bright and Bold |
| Glass | Subway Tiles | Neutral and Monochromatic |
FAQ
What is a retro modern backsplash?
What are the benefits of installing a retro modern backsplash?
What materials can I use for a retro modern backsplash?
Should I do a DIY installation or hire a professional?
How do I prepare my workspace for backsplash installation?
What are the steps for installing a retro modern backsplash?
How do I maintain my retro modern backsplash?
Where can I find inspiration for my retro modern backsplash?
Source Links
- https://backsplash.com/retro-kitchen-backsplash-charming-appeal-of-vintage-tiles/?srsltid=AfmBOoppuUViCKNAZR_uWGeRMPzSaIf3rCwyZvihdnyOR2H-ODAuvavB
- https://www.pinterest.com/ideas/vintage-tile-backsplash/936978426846/
- https://www.pinterest.com/ideas/modern-transitional-kitchen-backsplash/940156690182/
- https://backsplash.com/retro-kitchen-backsplash-charming-appeal-of-vintage-tiles/?srsltid=AfmBOooyOSHIjXHpEKPJYOxBlrIA3VEzvKkRv1V9TEFD_9aMZTub7VhB
- https://backsplash.com/midcentury-kitchen-backsplash-natural-elements-with-bold-patterns/?srsltid=AfmBOopyFiBInfQtkGokfFDyu75FJlS5a2fpvDTg-ufIwMkpZW3teMys
- https://abatiellodesigncenter.com/blog/capture-vintage-kitchen-design-kitchen-remodel/
- https://www.cypresscab.com/vintage-elements-modern-kitchen-remodels/
- https://baczewskiluxury.com/classic-vs-modern-kitchens/
- https://zen-renovations.com/blog/how-to-choose-the-perfect-kitchen-backsplash-for-your-renovation-project
- https://guilincabinets.com/types-of-kitchen-backsplash-materials
- https://www.stonetiledepot.com/tile/kitchen-tiles/mosaic-tile-kitchen-backsplash/?srsltid=AfmBOorL_fUbb-b_exJM6HxljXRe3TIz28Y3NAbxkVZEC3YhPwTchhwy
- https://guilincabinets.com/porcelain-kitchen-backsplash-pros-and-cons
- https://kitchencabinetkings.com/ideas/kitchen-backsplash?srsltid=AfmBOoriZ72LPqZHh4GndHoCxkgj-X8ZAcwP0CUD21GF0zXV63CcTTdv
- https://www.eliteflooringinc.com/blog/articles/5-kitchen-backsplashes-for-retro-flair
- https://www.tileshop.com/inspiration/tile-ideas/backsplash?srsltid=AfmBOoocXX3s-APp5h9N09EzMmWxEsfn3RTxIVNw4yBSPNldpjSsfpJU
- https://comestayawhile.com/kitchen-tile-backsplash-installation-for-beginners/
- https://anorganizedseason.com/install-a-tile-backsplash-in-the-kitchen/
- https://thediymommy.com/how-to-install-kitchen-backsplash-tile-an-easy-guide/
- https://www.homesandgardens.com/advice/how-to-install-a-backsplash
- https://itsmynest.com/old-backsplash-styles-comeback/
- https://backsplash.com/retro-kitchen-backsplash-charming-appeal-of-vintage-tiles/?srsltid=AfmBOoqwMbNhxdaj2Q4bTW7uWXE0uY-84bcRNHMmTmJOtrwCDvh3TVvV
- https://www.kitchentuneup.com/east-brunswick-nj/blog/9-essential-tips-for-vintage-kitchen-makeovers/
- https://www.patrickafinn.com/blog/kitchen-backsplash-guide-top-3-things-to-consider-when-designing-your-kitchen-remodel
- https://www.pinterest.com/ideas/retro-kitchen-backsplash/921395422829/
- https://kirklandsflooring.com/2021/02/23/5-kitchen-backsplashes-for-retro-flair/
- https://www.flooranddecor.com/blogs/top-five-mid-century-kitchen-backsplashes.html?srsltid=AfmBOooew_L1YGYYtBdBO-oTigkzvVg1oypA48N76rSSAbPUiLjrBM-v